MGID Review for Advertisers - AdsHeavy Native Ads
We’ve already reviewed Outbrain, Taboola, Verizon Media Native, and Revcontent. Today, we’ll add one more platform to this list – meet MGID, a native advertising platform that serves 850 million unique visitors per month.
Special offer: We have an exclusive deal for you. Anyone who follows the link below to sign up and deposit from $1000 to $5000 will receive a 25% bonus on MGID ads.
Before you choose the right native advertising platform, you’ll research all the peculiarities of suggested networks. So, how is MGID different from other popular platforms? What type of traffic does the network offer? Are MGID dashboards intuitive enough? To find the answers, we conducted an in-depth analysis of the platform and went through the process of creating the first MGID campaign from scratch. Here’s what we’ve learned.
Disclosure: This post may contain affiliate links. This means we may earn a commission if you buy something through our links at no additional cost to you.
What is MGID?
MGID is a native advertising platform founded in 2008. Since then, the company has grown from a startup into a fully-fledged native advertising company.
MGID partners with 31650+ publishers all over the world, delivering advertisers high volumes of diverse traffic. With MGID native ads, advertisers can reach audiences from Europe, the USA, Asia-Pacific, and Canada.
MGID’s top verticals
If you promote a product or service that appeals to broad audiences, advertising on MGID might be a good decision. Here are four verticals that perform especially well on MGID:
- Technology and computing. This vertical has recently seen a dramatic growth in France.
- Shopping. Ecommerce ads are becoming more and more popular among Indian audiences.
- Dating. MGID’s dating ads deliver great engagement rates from people in India, the United Kingdom, and Vietnam.
- Nutraceuticals. This category includes health, beauty, and weight loss products. It’s in demand among audiences from Asia, Czech Republic, and Italy.
- Gaming. For the promotion of gaming services, MGID recommends focusing on audiences in Germany and the USA.
- Gambling. Gambling includes online casinos, bingo, poker, etc. Europe, Asia, and North America are the best-performing countries for this category.
This is by no means an exhaustive list of categories that might benefit from MGID advertising. Even if your offering doesn’t fall under any of the above-mentioned verticals, but you want to run scalable campaigns for relatively low costs, you should definitely explore this platform.
It’s also worth mentioning that three quarters of the platform’s traffic is mobile, which just proves the fact mobile devices have taken over desktops in terms of driving paid traffic.
Creating your first MGID ads
There are a few things you need to know before you create your own native ad campaign inside MGID. To learn more about the strengths and weaknesses of this native advertising platform, we’ll look at its dashboards, available campaign settings, and tracking capabilities together with you.
MGID dashboard
After you create your account and verify it, you’ll get access to your MGID dashboard. What’s displayed there?
Before you create your first account, it’s not very informative:

But after you create your first campaigns, you’ll see there your performance data, such as the amount of money spent, campaign status, number of clicks, CPC per campaign, conversions, and cost per conversion.
From your dashboard, you can also access a dashboard for publishers, just in case you also want to monetize your website.
Apart from that, there are just two CTAs – the ‘Add Funds’ one allows you to, you know, add funds, and the ‘Add Campaigns’ one, well, it’s too obvious.
Budget
By clicking on the ‘Add Funds’ button, you come to a form where you can add your payment details and your deposit.
The minimum sum required to start advertising on MGID is $100. If you want to get a dedicated account manager, you’ll need to have at least $1000 in your balance.
The minimum bid for tier 2 countries is $0.01 per click. However, to target tier 1 countries, you should be ready to spend between $0.015 and $0.1 per click.
Campaign settings
When you’re ready to create your first MGID campaign, click on the ‘Add Campaign’ link.
Different native ads platforms hardly differ considerably when it comes to the campaign setup process. They require you to specify your goals, define targeting options (which are also more or less similar across various platforms), and create ads following their guidelines. So, will MGID meet our expectations?
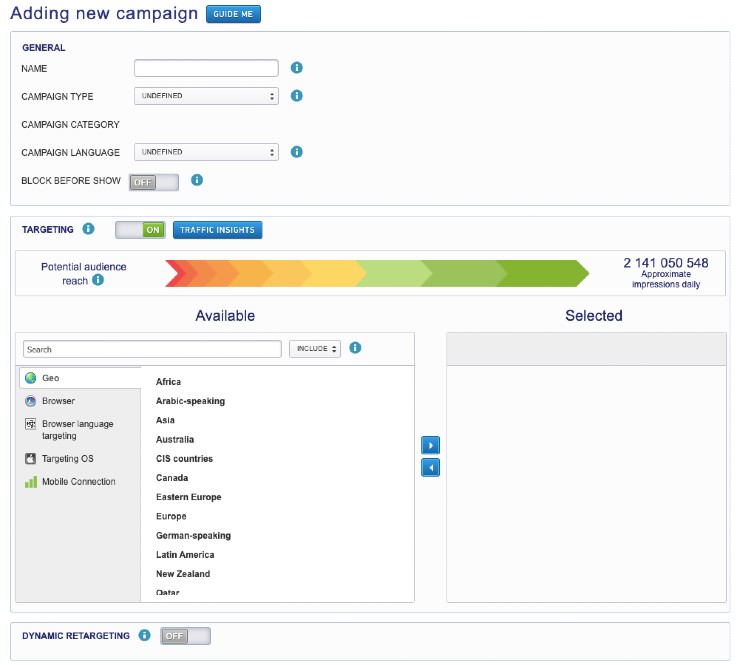
Above you can see all the settings you’re offered to configure at the first step of campaign creation. The first thing you won’t find in Taboola or Outbrain is the ‘Campaign Type’ field.
Campaign types
Instead of asking about your goals, MGID offers you to select your campaign type.
There are three options available: product promotions, content promotions, and push. You’ll select ‘product promotions’ when you advertise your service or product pages, ‘content promotions’ when your promoted assets are articles, and ‘push’ when you want to run a push notifications ad campaign.
Categories
Next, you should choose a category of your offering. By defining the category that matches your campaign content, you allow the system to select the group of sites your ads should be served on to reach the most relevant audiences.
MGID groups publishers by the following major categories:
- Automotive
- Books and literature
- Business and investing
- Events and attractions
- Family and relationships
- Food and drink
- Healthy living
- Home and garden
- Medical health
- Personal finance
- Pets
- Real estate
- Shopping
- Sports
- Style and fashion
- Technology and computing
- Travel
- Video gaming
Most of the categories are even divided into subcategories.
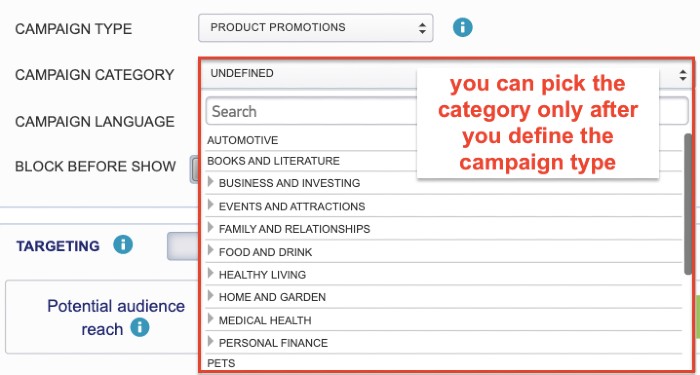
This feature looks similar to the interest targeting of Outbrain and marketplace audiences of Taboola. But while such audience segmentation is optional inside these two platforms, MGID requires you to take this step. Although this requirement might seem to limit your reach significantly, that’s not the case. MGID doesn’t apply too granular grouping, using these categories to exclude completely irrelevant websites that might only waste your budget.
Note: In case you fail to select the right category, MGID account managers will fix that when approving your campaign.
Want to connect with other native advertising experts?
Join the Native Ad Talks community on Slack and learn from other professionals, share your experience, and more.

Campaign language
Mind that one campaign can support only one language. This means that if you want to target different GEOs where people speak different languages, you’ll need to launch separate campaigns for every specific language.
Targeting options
Along with categories and languages, there are 5 more criteria you can filter your target audience by:
- Geo. Like any other advertising platform, MGID allows advertisers to target specific geographic areas, like countries or regions.
- Browser. With MGID, you can get really granular in browser targeting. There are 15 options available, including Google Chrome, Safari, Opera, Firefox, and others.
- Browser language targeting. You can select one or multiple browser languages.
- Targeting OS. This option enables you to filter different device types. We highly recommend that you separate your campaigns based on the device type. By doing this, you can get more granular insights into the performance of mobile and desktop campaigns and allocate your budgets based on your learnings.
- Mobile connection. Some experts claim that targeting mobile users when they’re connected to Wi-Fi can be extremely effective. First of all, people that use mobile data connection are most likely to be on the go, meaning they are less likely to convert. Also, video ads load faster on Wi-Fi, which ensures a smoother user experience.
To create a dynamic retargeting campaign, you’ll need to contact your account manager. Dynamic retargeting allows you to create ads specifically for your previous campaign clickers. Thus, to collect enough data and benefit from using this feature, you’ll need to run broader campaigns with basic targeting settings first.
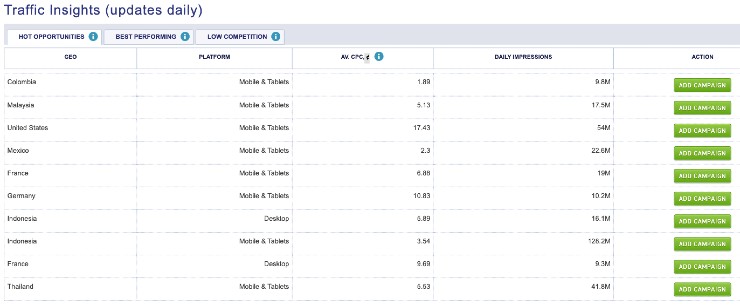
Tip: MGID offers traffic insights – the data on the markets (countries) with the lowest competition, lowest CPCs, and the highest performance. It’s accessible from the campaign settings section.
Schedule
You can either select to run your campaigns continuously or define days and timeframes you want your ads to be displayed.

When you unroll settings for hours and days of the week, you’ll be offered four default options: Pause campaign for weekends; Pause campaign for workdays; Pause campaign for business time; Start campaign for business time.
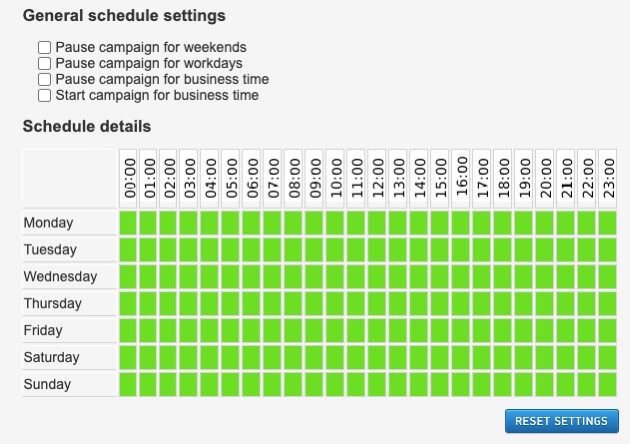
If none of the default options works, you can select timeframes manually. Mind that here you choose times to pause campaigns, and we don’t recommend that you go too specific with your first campaigns.
Limits
It’s better to set daily limits if you don’t want to waste your allocated budget too fast.

Before you understand the pace campaigns are being run at and optimize the, limit your first campaigns by budget. After that, you might want to define your daily clicks or conversion goals there.
Campaign tracking
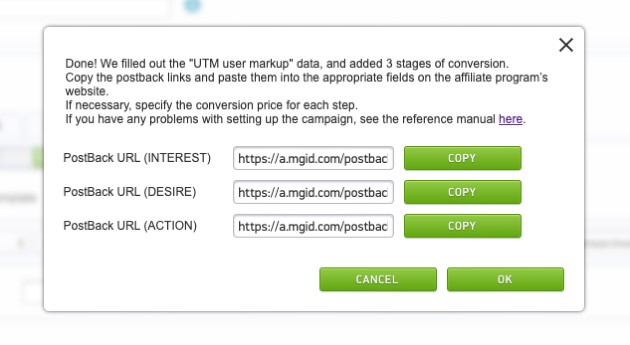
With MGID, you can monitor your campaigns by using UTM parameters, placing the tracking code on your pages, or by using the MGID postback tracking.
![]()
You can connect your Google Analytics to your MGID account and even implement the MGID pixel to your Google Tags Manager workspace to access conversion data right in your GA account.
If you are an affiliate marketer and don’t have access to the source code of your landing pages, use a postback URL to track your campaigns. To set it up, follow the guidelines in the MGID knowledge base or ask your account manager to assist you. Alternatively, MGID provides postback URL templates for 3 stages of conversion (interest, desire, and action) that you can just copy.
Ad creation
After you configure and save all the campaign settings, it’s time to create ads.
The whole process is simple and straightforward. One of the features that should be highlighted here is the opportunity to set different bids for different GEOs.
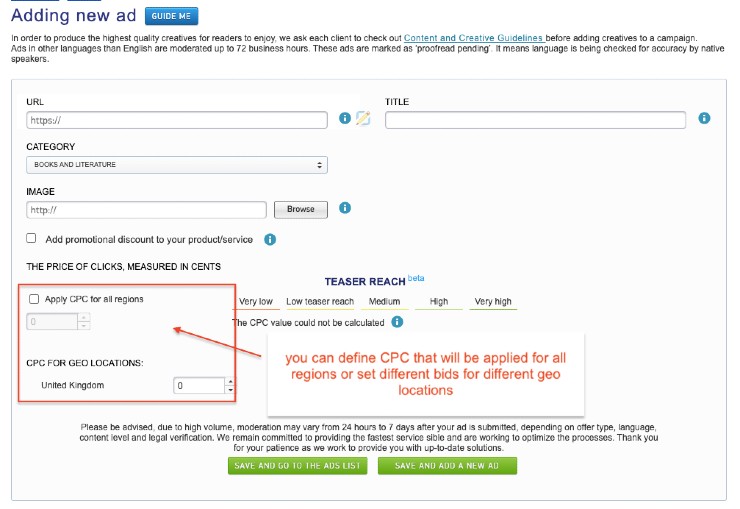
Follow MGID content guidelines to meet their standards and ensure you don’t apply forbidden practices. To bring your campaigns to high performance, you’ll need to test different combinations of headlines and thumbnails. Add at least 10 different ads and monitor their performance.
Once you submit your ads for the review, it might take from 24 to 72 hours for the MGID team to approve or reject them.
Ongoing optimization
When your ads are approved and campaigns go live, keep track of your campaigns. By analyzing your performance data regularly (daily, weekly, and monthly), you’ll get insights into what can be improved and how you can achieve that.
Inside MGID, you’ll get reports on your campaign performance, see statistics by domain, GEO, OS, and ads, and access selective bidding. This feature allows you to exclude publishers and adjust CPCs for specific placements or targeting options (GEOs, browsers, OS, etc.).
If you decide to run your campaigns with MGID, remember that your account manager can facilitate the process significantly. They’ll guide you through MGID unique features, provide you with actionable tips, and help you launch campaigns that will reach your initial goals.
Ready to set up your first campaign? Start with signing up.
Whether you’re a publisher or advertiser, there’s something for everyone with AdsHeavy.


